Table of contents [hide]
- 1 OUTLINE
- 2 Pose Pose
- 3 HAS NO DAMAGE? WHAT DAMAGE? WHERE?
- 3.1 If it's a broken bone
- 3.2 If it's a dislocation
- 3.3 If it's a sprain
- 3.4 Injury to soft tissues
- 3.5 Some notable X-ray positions
- 3.5.1
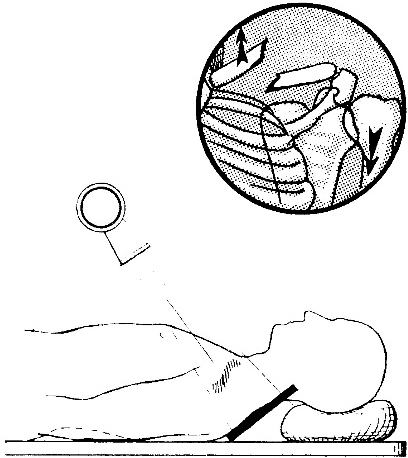
- 3.5.2 Figure 15.7. Cross-clavicle projection
- 3.5.3 Clavicle scan
- 3.5.4 Match the blow
- 3.5.5 Shoulderblade
- 3.5.6 Shoulder
- 3.5.7 Elbow joint
- 3.5.8 Two forearm bones
- 3.5.9 Pelvic, hip joints
- 3.5.10 Femoral neck
- 3.5.11 Body of femur, lower head of femur, knee joint
- 3.5.12 Patella
- 3.5.13 Ankles, tibia, two ankles
- 3.5.14 Talar bone, heel bone
- 3.5.15 Lisfranc joint, Chopart . joint
OUTLINE
Although there are now many modern imaging methods such as CT-scan, MRI, etc., which give very clear images of the body parts, but for bone and joint injuries, the classic X-ray is the classic X-ray. (convention) normal or digital photography still plays an important and popular role. X-ray films have the following benefits:
- Implementing the quadrants
- Follow up treatment
- Do medical evidence.
A substandard radiograph will be difficult to make an accurate diagnosis. Therefore, in order to promote the diagnostic effect of the film, the photographer must take the correct picture and the reader must know how to read it.
Here are some requirements to know when reading movies:
What part of the film do you see? Film quality and shooting time
- Place the film on the film illuminator in the correct direction: Imagine the film as the patient facing us. The proximal (upper) end is placed above and distinguishes the right from the left. Particularly for the hands and feet, let the toes point up. The part to be photographed must be clearly visible on the film (usually determining where the film is coming from). In order to observe a lot of details, the area to be captured must be in the middle of the film.
- Film quality: If the film is good, the contrast between bone and soft tissue is clear. Many good radiographs can see the trabeculae at the ends of the bones. Films taken with hard or soft rays do not describe all the details to be observed, they are only valuable in some special cases when ordered by the doctor himself.
- Filming time (date month year): indicated on the film next to the patient's name, left or right. Usually these letters are made of lead and attached to the front of the film frame (cassette) will be printed at the same time when shooting.
Nowadays, many shooting facilities are equipped with special printers to print the words on a corner of the reserved film, people record more accurately: the time of shooting, including hours and minutes. The patient's name includes both the first and last names, and the year of birth. The name of the photographer, the ID number of the film and the parameters of the ray intensity, etc. Record a lot of details to help readers know exactly when shooting and not confused with other films.
Pose Pose
Usually take two poses (two planes):
- Straight (face) shot: is taken from front to back or vice versa
- Tilt (side): is shooting in the direction perpendicular to the film taken straight
- Depending on the injury, the doctor requires other shooting positions such as:
- + Oblique: the beam goes oblique to the straight ray at a predetermined angle (usually from 45 to 60 .)o).
- + Take tangent: position the limb and the film so that the focus ray follows the tangent line to the surface to be imaged. For example, tangential imaging of the patellar condylar joint.
- + Dynamic photography: capture the limb area in an active or passive exertion position (this movement is kept still when shooting). For example, scan for signs of dislocation.
A good photographic film must meet three things (3 points):
- Sufficient photography: film taken in one limb area clearly shows two joints at both ends. A full radiograph helps us to see the whole limb area, pinpoint the exact location of the injury and displacement, in addition, it also helps to detect accompanying lesions that may not be detected during clinical examination. avoid omission (For example, a case miss hip joint enclosed in fracture femur body). However, in order to see the lesion clearly, this area must be in the middle of the film, so in addition to the conventional film taking two joints, it is recommended to take an additional film that can only take one end of the bone near the place of injury.
- Take the correct position required: the film is not taken correctly, it is difficult to accurately identify the lesion. The clinician needs to work with the radiologist to position the radiograph correctly.
- Capture quality.
HAS NO DAMAGE? WHAT DAMAGE? WHERE?
Careful observation of all limb areas captured on radiographs including bones, joints, and soft tissues must be observed. To determine whether a lesion is present on radiographs, it is necessary to know the normalization criteria for imaging on the respective limb regions of the normal person. Sometimes it is necessary to have a film of ordinary people to compare and contrast. In childhood trauma, it is common practice to photograph both limbs in the same position for comparison.
If it's a broken bone
If fracture need to define:
- Which bone is broken?
- Break location
- Broken line
- Displacement degree.
Which bone is broken?
Which bone is broken: give the correct anatomical name of the bone.
Break location
Fracture location: according to anatomical location. For a long bone, it is divided into three parts as follows:
- Proximal head
- Bone body
- Distant head.
Distinguish the bone head from the body by the cortical bone. The bony body has a thick cortical bone and a medullary canal. In the bony body, people are divided into three regions: upper third; Middle 1/3 and bottom 1/3.
Thus, for a large long bone such as the femur, the fracture sites are as follows:
- Upper head
- Connecting the upper end to the upper 1/3
- 1/3 above
- Junction of upper 1/3 with middle 1/3
- middle 1/3
- Joint between the middle 1/3 and the bottom 1/3
- lower 1/3
- Joint of lower 1/3 with lower end
- Lower head.
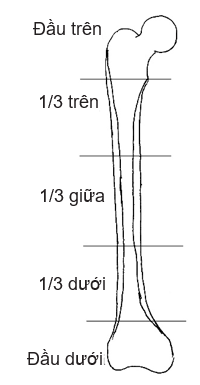
Figure 15.1. Long bone fracture location
The fracture site is also referred to by the specific anatomical name for that area. For example: femoral neck, femoral head, intertropical, below trochanter, above two condyle, medial condyle, lateral condyle, etc.
- Incomplete fracture type:
- + Fracture
- + Broken
- + Subsidence fracture
- + Fracture of cortical aneurysm
- + Fracture (no fracture line visible, only more curved bone)
- + Fracture on one side of the bone shell (fracture of fresh branches).
- Complete fracture type:
- + Transverse fracture: fracture line perpendicular to the longitudinal axis of the bone
- + Cross fracture: fracture line is not perpendicular to the longitudinal axis of the bone
- Spiral fracture: spiral fracture.
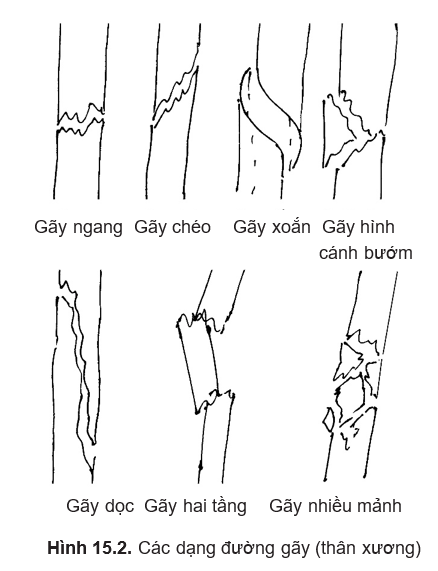
Broken line
The fracture line can meet the following types of broken lines:
- Fracture with the 3rd fragment (butterfly): the large fracture affects the stability of the bone.
- Multi-fragmentation (fracture): large fractures that affect the stability of the bone.
- Longitudinal fracture: fracture along the longitudinal axis of the bone (a type of long diagonal fracture).
- Two-stage fracture: there are two fractures separated by a bony canal. If the bone is split longitudinally, it is a multi-fragmentation fracture.
At the top of the bone, there may be many broken lines, such as T, V, and Y-shaped fractures. Pay attention to whether the fracture line breaks the joint (penetration fracture).
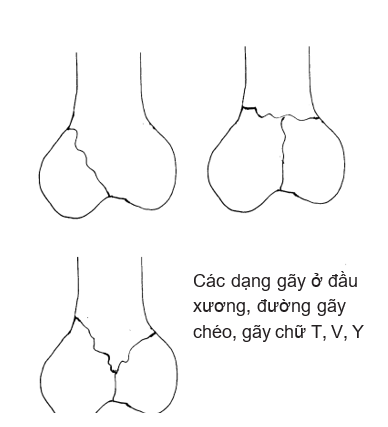
Figure 15.3. Types of fracture lines (bone ends)
Based on the fracture line to assess whether the fracture is stable or unstable.
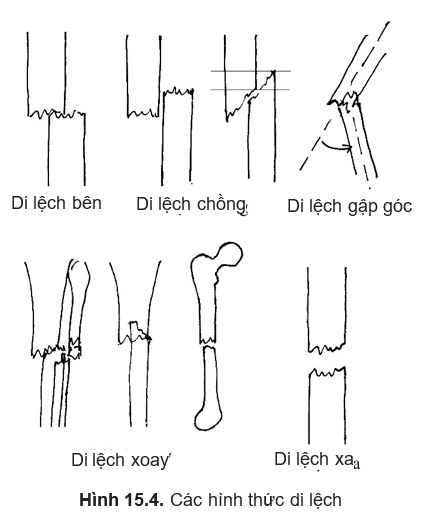
Displacement
Displacement: a broken bone may or may not be displaced. Incomplete fractures are usually nondisplaced, with the exception of fresh branch fractures with angular displacement. Complete fractures usually have little or no displacement. When reading displacement, attention should be paid to:
- Displacement type
- Displacement degree.
By convention, displacement orientation is based on displacement of the distal fracture relative to the proximal fracture. Fractures in the bony shaft can experience five types of displacement:
Move to the side
Displacement of the distal fracture to the medial, anterior-posterior relative to the proximal fracture. On straight film only the displacement is inward or outward. On slant film, only anterior or posterior displacement is determined.
Degree of displacement: take the width of the bone body as a standard to measure. We have levels: 1 cortical, 2 cortical, 1/4 bony, 1/3 bony, 1/2 bony, 2/3 bony, 1 bony, over 1 bony. The degree of displacement indicates the contact of the two ends of the broken bone, assessing the ability bone healing, the more contact, the easier it is to heal the bones and make them firm. Do not use length units (cm, mm) to measure the degree of lateral displacement because for the same amount of displacement, there may be a small displacement on a large bone, but a large displacement on a small bone. .
Displaced husband
Husband displacement: also called axial displacement near each other. The degree of displacement is in millimeters. The correct position to be measured must be determined based on the fracture line. In case of multi-fragmentation fracture, the degree of displacement cannot be accurately determined (only determined by clinical limb measurement).
Angular displacement
Angular displacement: The limb axis of the distal segment is not coincident with the axis of the proximal fracture but forms an angle.
- Displacement direction: is the direction of the angle formed by the limb axis of the two fractures.
- Displacement degree: is the measured value of the angle between the axis of the distal fracture and the extension of the axis of the proximal fracture.
Rotation displacement
Rotation displacement: is the displacement of the distal fracture about its longitudinal axis. It is only necessary to determine whether there is rotational displacement or not, but the degree of displacement is difficult to measure accurately. To determine rotational displacement, it is necessary to demonstrate that the two fractures are not in the same plane on the same radiograph. This can be seen:
- Two fractures are not in the same plane (if two joints are taken at both ends)
- There is a clear difference in the diameter of the bone body near the fracture line of the two segments
- The two-segment broken line doesn't match
- In a two-bone fracture (forearm or lower leg), the parallel passage of the two bones is not the same in the two fractures.
Displacement
Displacement: còn gọi là di lệch dọc trục xa nhau. Thường do cơ co kéo (gãy xương bánh chè, gãy mỏm khuỷu, gãy củ lớn xương gót, gãy các chỗ gân cơ bám vào xương) hoặc do cơ chèn vào khe gãy. Di lệch này có nguy cơ làm xương gãy không liền do hai đầu xương gãy không tiếp xúc. Mức độ di lệch tính bằng milimét.
- A fracture can have 1 to 4 types of displacement, since superimposed displacement does not result in distal displacement (not to be confused with lateral displacement > 1 body of bone as distal displacement).
- The penetrating fractures must be examined for articular facet canal leveling.
- For two-stage (or more) fractures, the displacement of each fracture is read, and then summed up to the displacement of the farthest fracture relative to the nearest fracture. The amount of displacement added includes superimposed displacement, angle folding and rotation. Lateral and distal displacements do not add up because these displacements are significant for each fracture (evaluate the healing ability at each fracture).
- The image printed on the film is a projection of all the parts in the imaging area that the X-rays pass through and affect the film. On conventional films (no zooming in or out) the imaged organs are usually slightly larger than the actual size of the organs, depending on the position of the lamp head, the position of the film, and the organ being imaged (because the beam is emitted in the form of a beam). divergence). To get an approximate size, ask the photographer to do a telephoto (télé) (ray emitted almost parallel). If the physician uses a ruler to measure the size of the bone or joint to select the surgical instrument in advance (implant), should subtract about 10% measured size.
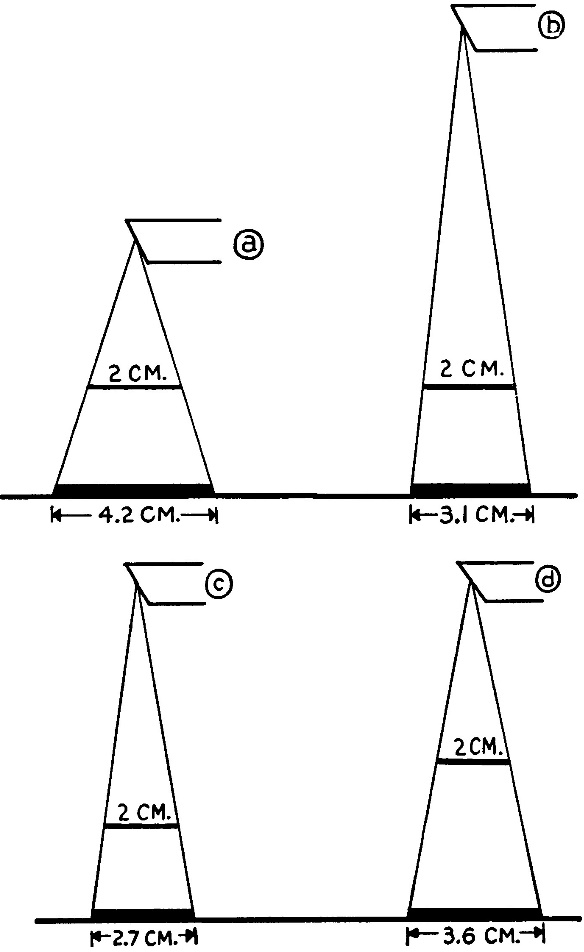
Figure 15.5. The distance between the lamp head and the subject will make the image magnified more or less
If it's a dislocation
If dislocation: X-ray film identifies the type of dislocation:
- Completely messed up
- Sold out
- Broken fracture.
Completely dislocated, the two ends of the bone no longer look at each other, the joint is completely lost. View the position of the crest to diagnose the direction of dislocation (upper-lower, anterior-posterior, medial-lateral).
Incomplete dislocation (semi-dislocation) has an irregular joint appearance.
Dislocation fractures are accompanied by an accompanying fracture at the dislocation site. Example: hip dislocation with posterior acetabular fracture or femoral neck fracture. Disturbance shoulder accompanied by a major trochanteric fracture or a surgical neck fracture. Disturbance elbow joint accompanied by a fracture on the top of the pulley or a fracture of the elbow.
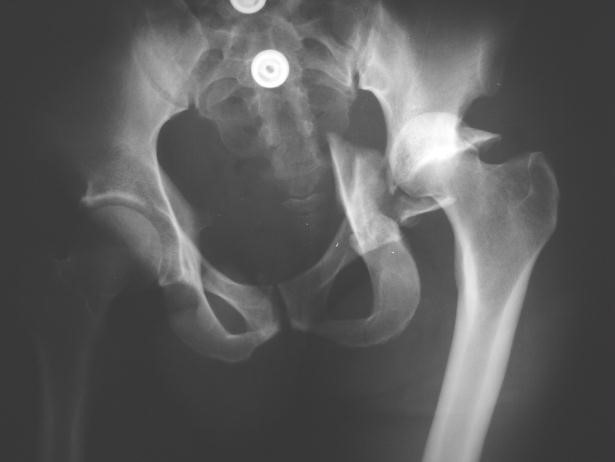
Figure 15.6. Loss of joint space indicates dislocation
If it's a sprain
On standard-position arthrograms, there is usually no lesion. If there is a fracture where the ligaments are attached, chipping is seen. For example, fracture of the tibial plateau, the ampulla of Stieda in the medial condyle of the femur.
On dynamic radiographs (dissecting the joint by extension or exaggeration) the unilateral joint space can be seen to be enlarged in sprains the lateral ligament.
Injury to soft tissues
Injury to soft tissues: It is possible to see the soft tissue taking up a larger area than usual and blocking the rays more or in the software with many bubbles (due to the wound) or a foreign body contrast.
Classic X-ray film is one of the imaging methods. In order to have an accurate diagnosis of a specific lesion, it is necessary to compare with the clinical.
Some notable X-ray positions
Figure 15.7. Cross-clavicle projection
Clavicle scan
Normally, the clavicle is visible on straight chest radiographs. Tilt films are rarely indicated. However, in some cases broken collarbone but the face film is not visible, need another position film. The "cross-projection" position will show the collarbone outside the ribs.
Match the blow
The sacroiliac joint is often seen on radiographs of the straight shoulder joint. However, in sacroiliac dislocations, in many cases a more accurate radiograph is needed in one of two ways:
Shoulderblade
Normally, the shoulder blades are also seen on straight thoracic radiographs. The image is clearer if taken when the opposite shoulder is placed to create the torso with the horizontal plane at an angle of 5 degrees. If you want to take a side view, you have to shoot at the shoulder joint:
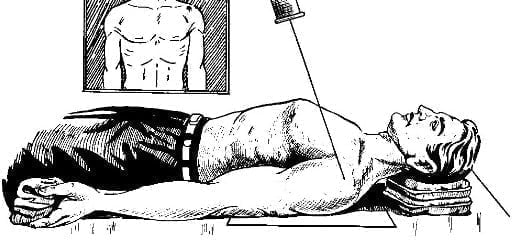
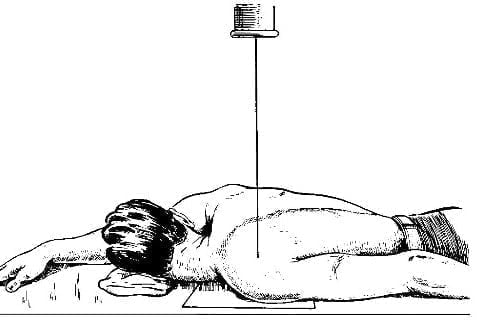
Figure 15.8. Two shooting poses with the same blow
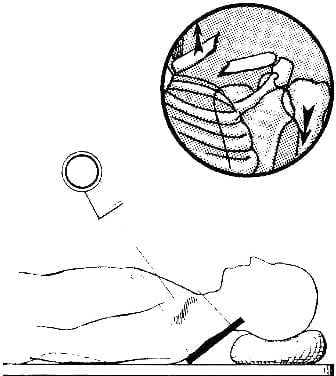
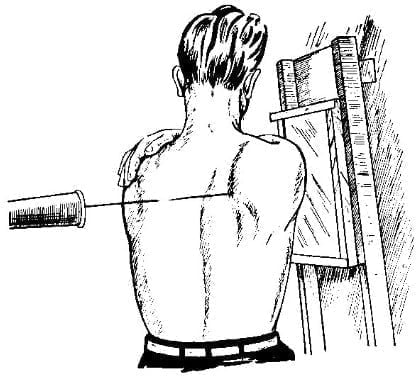
Figure 15.9. How to take a shoulder shot
Shoulder
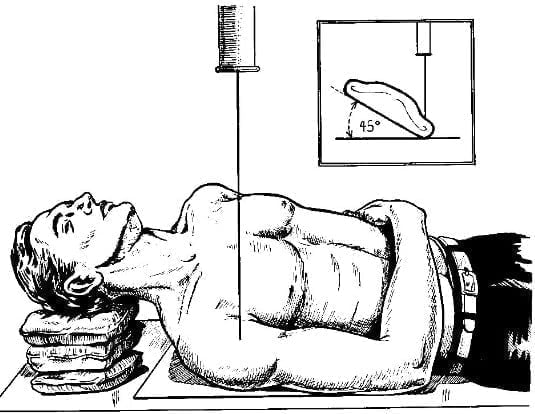
Figure 15.10A. The shooting position clearly shows the shoulder joint 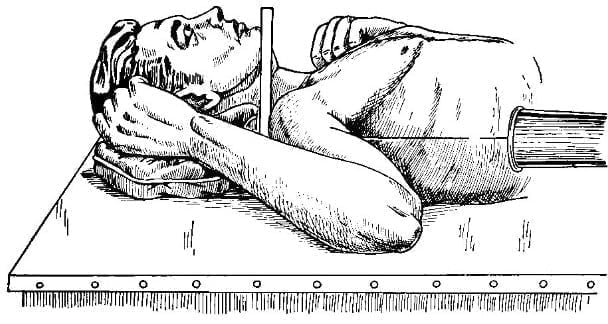
Figure 15.10B Tilted shoulder pose
To clearly see the shoulder joint gap, you need to put the opposite shoulder position:
Oblique shoulder arthroplasty: right shoulder spread and beam from the axillary fossa.
In shoulder dislocation, sometimes the shoulder is not allowed to spread to 90 degrees. To determine the position of the humerus head, a tilting scapula may be selected.
Hermodson's position: in shoulder dislocation, to see if there is a Hill-Sachs lesion (capsulation), a straight shoulder arthroplasty should be performed with the arm maximally rotating (possibly with the forearm behind).
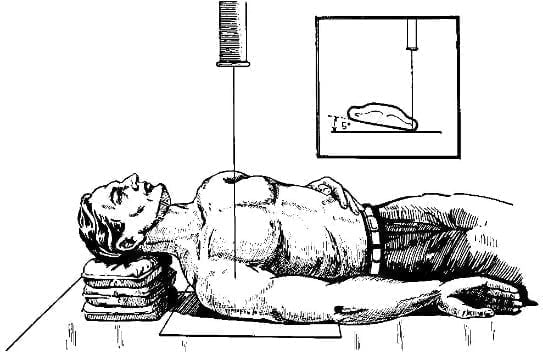
Figure 15.11. Shoulder arthroplasty with internal rotator cuff
Elbow joint
Straighten and tilt the elbow joint so that the forearm is fully supine. This is also the standard position for taking two bones of the forearm
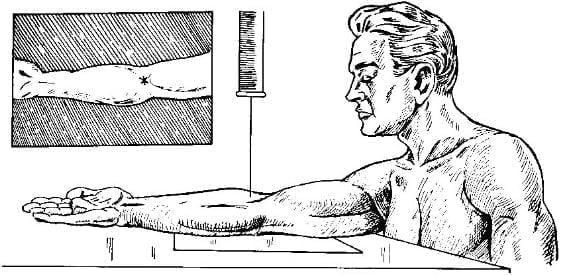 A. Straight elbow
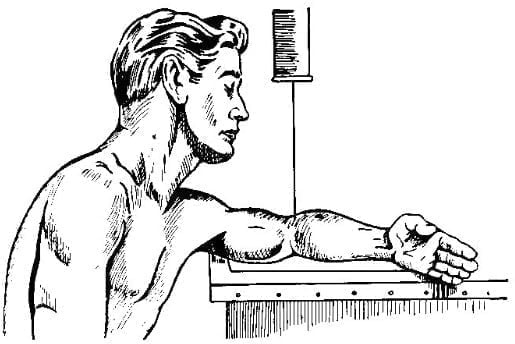
B. Tilt elbow
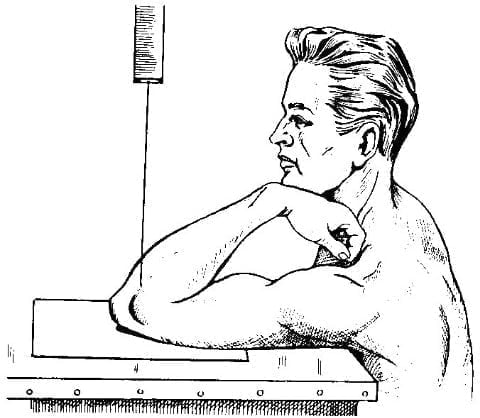
C. Tangential imaging of the elbow joint
Figure 15.12. Elbow
Two forearm bones
The standard posture when taking two bones of the forearm is the forearm to be fully supine, if the forearm is prolapsed, the radial bone will cross the ulna, in case of fracture it will be easy to mistake rotational displacement.
Wrist and hand: tư thế chụp xương thuyền:
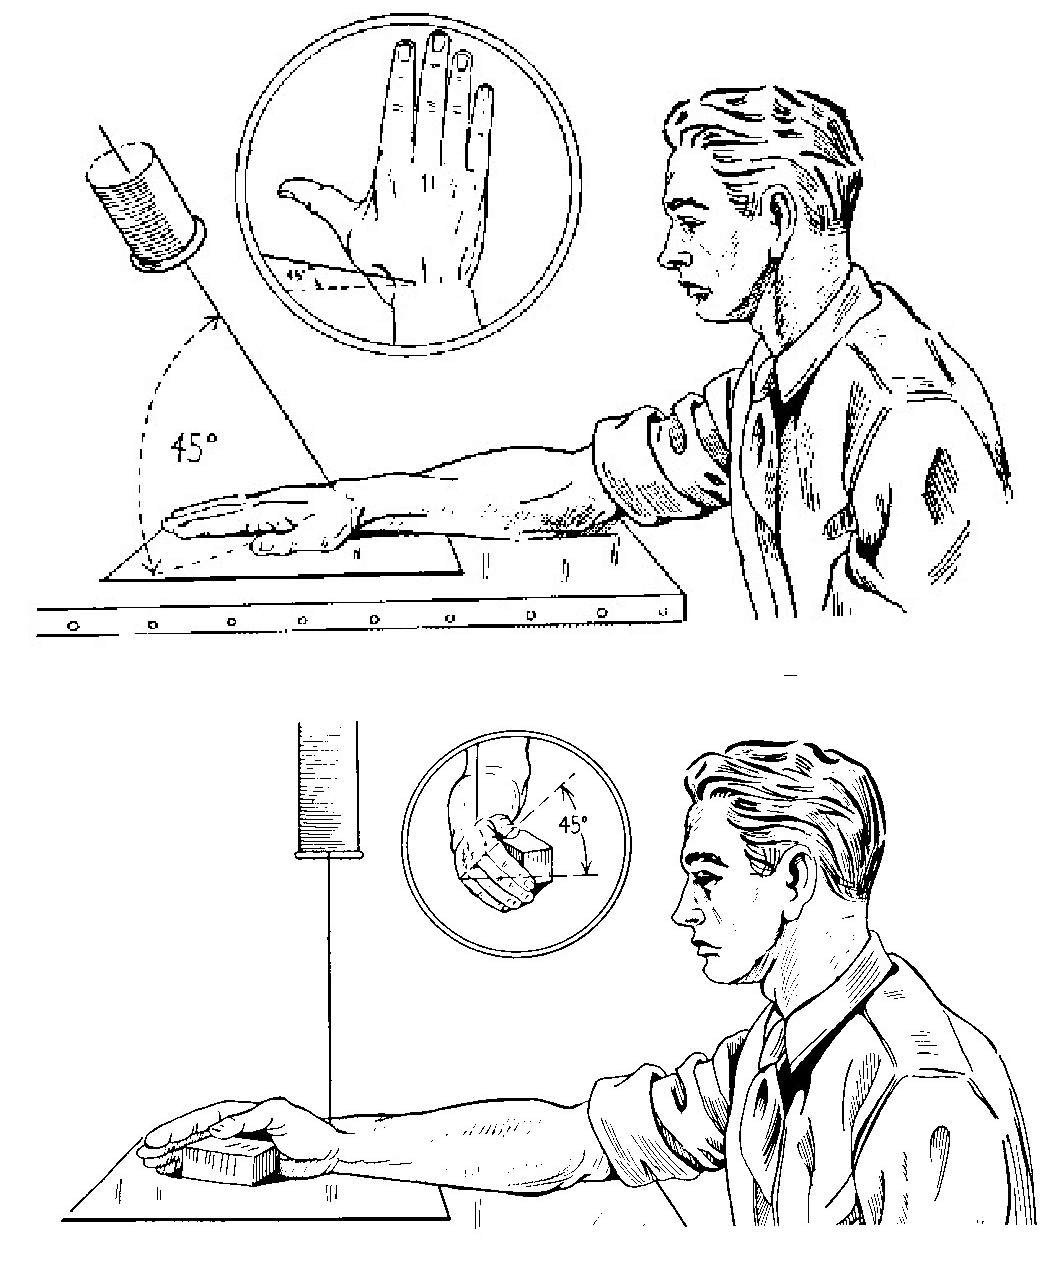
Figure 15.13. Two positions to capture the keel
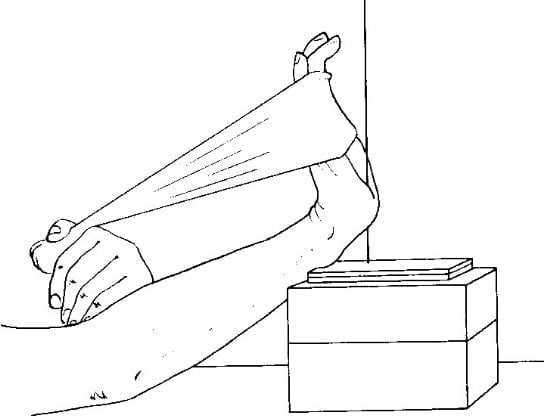
Figure 15.14. Shooting pose carpal tunnel
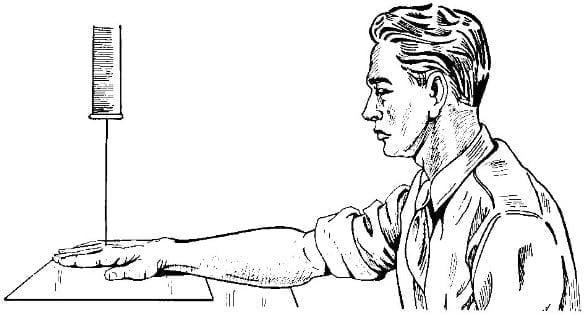
Figure 15.15A. Straight hand
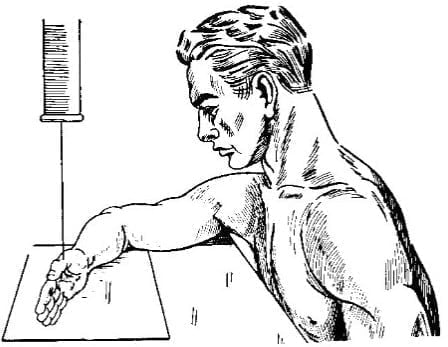
Figure 15.15B. Tilting hand
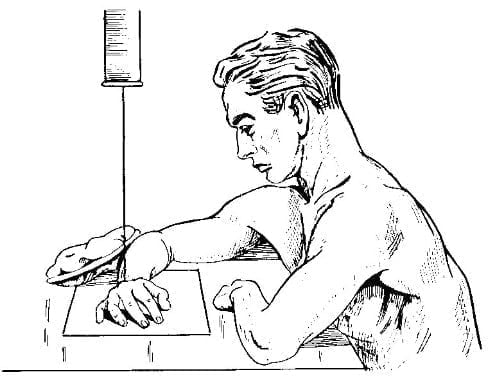
Figure 15.16. Hands cupped, fingers separated
Pelvic, hip joints
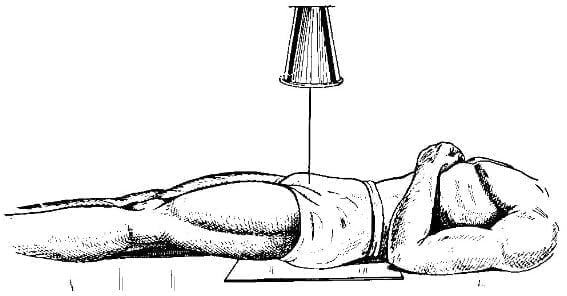
A. Straightening of the pelvis
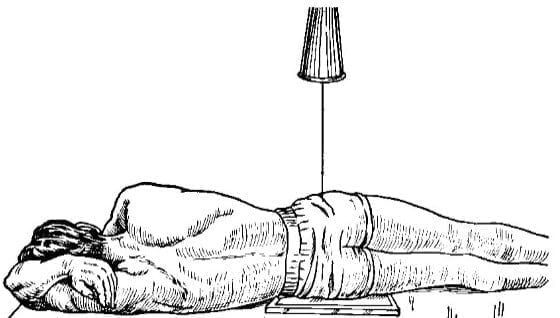
B. Pelvic tilt
Figure 15.17. Pelvic shooting
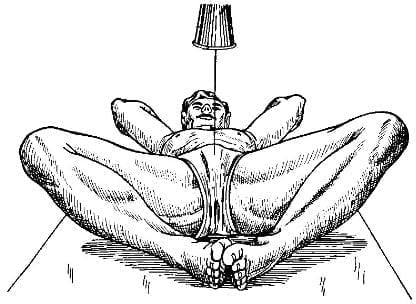
A. Frog Pose 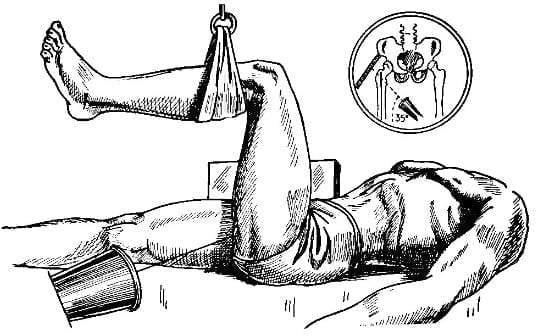
B. Tilted hip
Figure 15.18. Hip arthroplasty
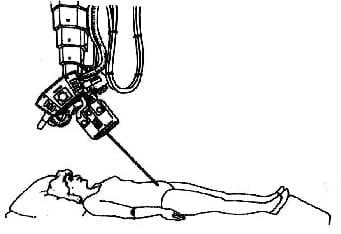
A. Inlet pelvic imaging 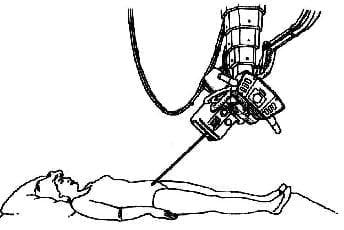
B. Capture the pelvis “outlet”
Figure 15.19. Capturing the “inlet” and “outlet” pelvis
Femoral neck
The standard film is a film of the hip. However, to see the femoral neck clearly, it is necessary to photograph the hip joint with the foot rotated in 20 degrees.
Tilted femoral neck scan can choose the "frog" position (easily taken in the operating room).
Body of femur, lower head of femur, knee joint
Standard radiographs, need to place the lower leg with the big toes of the feet touching.
Patella
In order to clearly see the patellar condylar surface, it is necessary to take a tangent position.
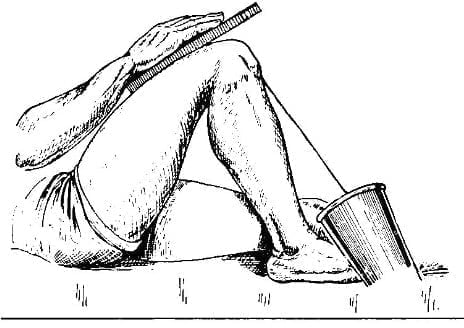
Figure 15.20. Tangential tea cake shot
Ankles, tibia, two ankles
Ankles, tibia, two ankles Ankle film to clearly see the lower tibialis joint, must allow the foot to rotate inward 45 degrees.
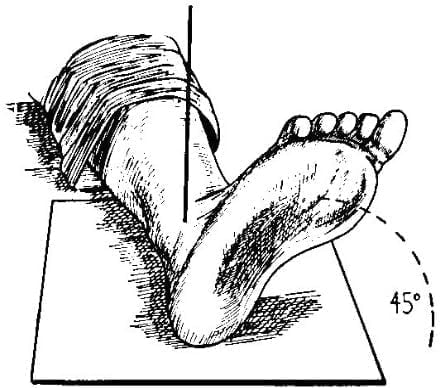
Figure 15.21. Photograph of the inward angled ankle
Talar bone, heel bone
The calcaneus is the inclined plane of the ankle. To get a straight calcaneus, shoot with the ankle flexed as far as the back of the foot.
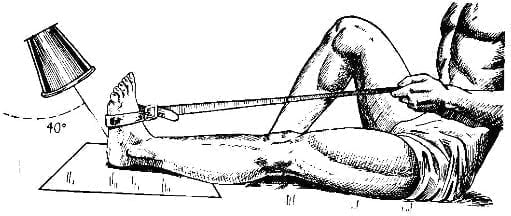
Figure 15.22. Straight heel bone scan
Lisfranc joint, Chopart . joint
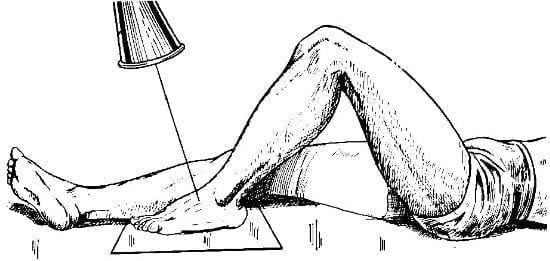
Figure 15.23. Lisfranc joint imaging
The illustrations in the article are taken from the book Radiographic Positioning and Related Anatomy by Isadore Meschan. WB Saunders Company Publishing House.


